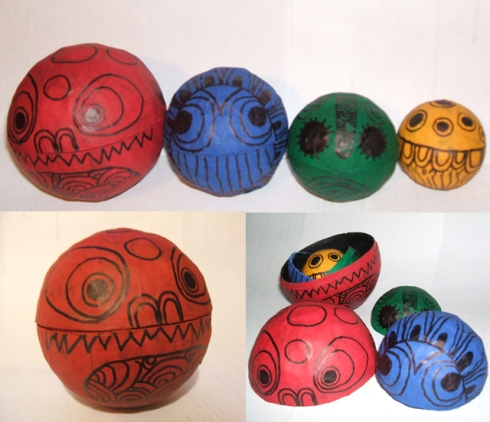
What do you get if you mix Alebrijes (wooden or papier mâché fantastical Mexican creatures) with Matrushkas (or matroyshkas or nesting Rusian dolls)? ALEBRUSHKAS!
This is the most challenging post so far. It´s not that hard to make but requires some patience and skill. There´s also some waiting time between layers of paper and paint so I can´t give you a precise making time but I can tell you it will take a few days; maybe one hour work for about 6 days. But be patient… you`ll have fun and the results are totally worth it!
You`ll need:
_ 4 different sizes of styrofoam balls. Mine are about 9, 7, 6 and 4 cm in diameter.
_ Tin foil.
_ Paper for recycling (maybe an old newspaper, printer paper, a discarded activity book, etc). It´s a good idea to have 2 kinds so that you can make the difference between one layer and the next.
_Water based all purpose glue.
_ Water based paints (coloured and black)
_2 brushes (one for the glue and one for the paint)
_2 small plastic containers (one to rinse your brush after you paint, the other one to make a water-glue solution).
_ A small hacksaw (ATTENTION KIDS! This is to be used by adults only!)
_ Flat screw driver.
_ Scissors.
_ Ruler.
_ Pencil and black felt tip pen or medium marker.
There are many steps involved in the making of Alebrushkas, so before I go to the usual step-by-step list, I`ll give you a quick summary of what we´ll do:
We´ll use the styrofoam balls as moulds to make 3 hollow spheres and a solid one. We´ll cover each ball with several layers of paper using a water-glue solution; then we´ll cut the 3 larger balls in half and remove the styrofoam to make them hollow. We´ll add a “ribbon” of paper to one half of each ball so that they can be closed again, to make them like boxes. When all the layering and cutting and closing back again is done, we´ll move to painting and finally decorating the spheres.
So here we go:
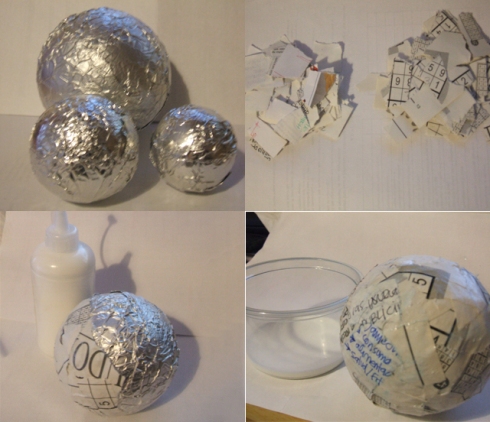
1. Cover the 3 larger styrofoam balls with tin foil. This is to prevent the paper sticking to the balls so that we can separate the styrofoam from the completed papier maché spheres when we want to make them hollow.
2. Cut or tear your recycling paper into small squares, about 2.5×2.5cm. Don´t worry, they don´t have to be perfect, this is just to give you an idea.
3. On one of your containers, mix 50 ml of water with about the same amount of glue. We don´t want the mix to be either too thick or too runny. If it´s too thick it will dry too quickly and won´t give you time to complete the layers; it will also be too hard to cut in the end. If it´s too runny, it won´t be sticky enough and it will take ages to dry up. When you put your brush into the mix and take it out again, you should not see drops but a “string” of the mix coming down, at least for a moment.
4. For the first layer of each ball, we´re going to use glue without water. Cover a small portion of the ball with a thin layer of glue and start sticking the pieces of paper. Keep adding glue and paper until you´ve covered the whole surface of the ball. Try to make it as smooth as possible. Cover all 4 balls.
5. Use the water-glue mix for the following layers. Add some of the mix and start sticking paper. It´s a good idea to put some of the glue on top of the pieces of paper as well; this will help you stick all the pieces together and make the surface smoother. You can do this with a brush or using your fingers; I find it easier with my fingers (and more fun too!) Remember to alternate the kind of paper you´re using for every layer; this will help you tell the difference between one and the other and make sure it´s all even.
6. Add 3 layers to each ball (including the first one) and let them dry for at least 4 hours. Good thing about this time of year is that you can leave the spheres to dry close to your radiator.
7. The smallest ball will be ready with just 3 layers. The 2 medium sized balls need 6 and the largest needs at least 8 but an extra layer wouldn´t hurt. Remember to add 3 layers a time and leave to dry. I recommend that you use white paper for the last layer, this will make it easier for the paint to cover the surface evenly. (trust me! I didn´t use white as the last layer and it took several layers of paint to cover whatever was printed on the paper.)
2 or 3 days later….it´s time to cut the spheres open. REMEMBER NOT TO CUT THE SMALLEST ONE!
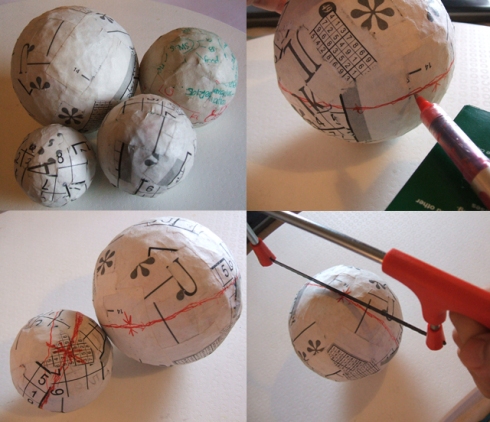
8. First of all we need to mark a line around the middle of each sphere. Find an object that is almost half as high as one of the spheres and attach a pen or pencil horizontally to it. The tip of the pen should be the same height as the “equator” of your sphere. Now hold the sphere close to the tip of the pen and make it rotate on it´s axis; as you do this, the pen should be drawing a line along the “equator” of the sphere. Repeat this step for the other 2 spheres.
9. Pick a spot along the line you just drew and make a mark on each side of it, for example 2 arrows pointing at each other. This will help you find the right way to close the balls back once you´ve cut them.
10. THIS STEP IS FOR ADULTS ONLY. Using the hacksaw cut each sphere along the “equator” line you marked. It´s not necessary that you cut all the way through the styrofoam, cutting the paper is enough to detach the pieces.
11. You might need the help of a flat screwdriver to separate the paper halves from the styrofoam balls. Be carefull not to damage the paper.
12. Repeat steps 10 and 11 to cut the other 2 spheres open. Remove the tin foil from inside all the pieces.
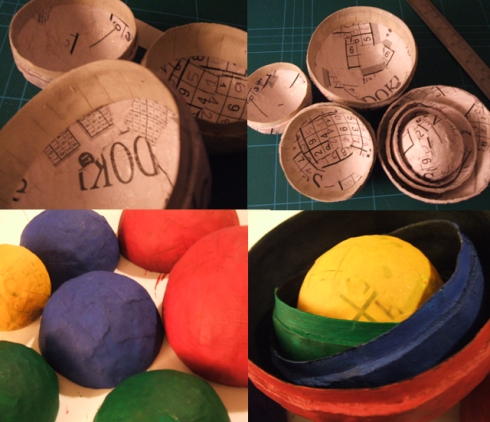
13. We want the spheres to close back again so that they can contain the others. On an A4 piece of paper, cut several 8 strips of paper 2 cm wide. Cut 3 more just 1 cm wide. These need to be neat so be sure to measure right and cut in straight lines.
14. Draw a line, 5mm from the edge, across the length of each strip (the line will be in the middle of the 1cm wide ones) and cut tabs all along the strips. The tabs should go on the wider side of the line on the 2cm wide strips of paper.
15. Take one half of each sphere. Using glue without water, stick one of the strips of paper around the inside of each one, making sure the 5mm section sticks out. Use the thiner strips for the smallest sphere of the 3.
16. Layer up a couple more strips on each sphere, this time using the water-glue mix, and leave to dry.
the following day… You should be able to open and close all the spheres and keep one inside the other.
17. You can start painting now! I chose red, blue, green and yellow to paint the outside of the spheres. You might need more than one layer for the colour to look even. Make sure you leave enough time between one layer and the next for the paint to dry.
18. Paint the inside of the spheres too. I chose black.
19. Once all the paint is dry and even, use your pencil to draw the face and details of your Alebrushkas. How about a food chain? or big fish eats little fish? could it be dad, mom and 2 kids… or maybe Goldilocks and the 3 bears? or perhaps some fantastical creatures from your dreams. The point is to use your imagination and have fun!
20. When you like how your design looks like, use a black marker to draw on top of the pencil. You could add more detail with colour paint.
DONE!
I hope you have as much fun as I did…


YO QUIERO UN ALEBRUSHKA!!! están increíiiiiiiiiibles!
puedes venir por ellas cuando quieras 😉
No manches que padre esta tu pagina mafer! me creeras que a penas acabo de ver el mail que nos mandaste? lo que pasa es que ya no uso el mail que tenias; pero muchas felicidades por el blog esta impresionante. Un abrazo!
Wow!!! I want one of these!!! It looks amazing Fer!