Tag Archives: characters

49_Glover

31 Dec

The only hand puppet with multiple personalities…

© 2011 Fernanda de Uriarte

Really quick and easy, this one will take you about 30 min. to make.

You´ll need:

_A glove (an old or odd one)

_Different colours of felt

_Felt tip pen

_Scissors

_UHU glue

How to make a handy puppet:

1. Cut a couple of felt circles, a bigger one, about 2cm in diameter in white, and a smaller one in black.

2. Stick the black circle on the white one to make an eye.

© 2011 Fernanda de Uriarte

3. Put the glove on. Put your 4 fingers and thumb together as if to make a mouth and stick the eye on the side of your index knuckle.

4. Cut a little drop like shape on red felt and stick it in the middle of your hand to resemble the puppet´s uvula.

© 2011 Fernanda de Uriarte

Personality one done:

© 2011 Fernanda de Uriarte

5. Cut more eyes in different colours and shapes and stick them on the other fingers of the glove. Leave the thumb clear.

© 2011 Fernanda de Uriarte

6. Now arrange your hand in any position you like to see a different personality of Glover appear.

© 2011 Fernanda de Uriarte

© 2011 Fernanda de Uriarte

© 2011 Fernanda de Uriarte

That´s it!… Take good care of Glover and all his personalities.

47_Radioactive Space Invaders

30 Dec

Don’t believe those who claim to have seen alien life forms… this Radioactive Space Invaders are the real thing!

© 2011 Fernanda de Uriarte

It will take you about 45 min to make a Radioactive Space Invader

You´ll need:

_To download and print this file: radioactive space invaders

_ A piece of A4 card for each Space invader you want to make. (You could recycle a cereal box or the back of a paper block for example)

_Cutter or scalpel and a cutting mat or a surface to cut on

_UHU glue

_Pencil

_Black felt tip pen or fine liner

_Glow in the dark paint

_A thin paint brush

How to make a Space Invader:

1. Download and print the file above. If your printer can take card, you can print directly on it; otherwise, print on a regular sheet of paper and stick the print on the card.

2. Using your cutter or scalpel, cut the edges of the print. The dotted lines on the drawing indicate where you’re supposed to score, that is pass the knife a few times without cutting all the way through. This will make it easier to fold all the sides to put your Space Invader together.

3. Fold the card over the dotted lines and glue it together using UHU glue.  Let the glue dry for a couple of minutes so that the Space Invader is sturdy enough for you to handle it.

4. Paint the whole thing with the glow in the dark paint. Let it dry. (Drying time varies depending on the paint you got; read the instructions on the label of your paint).

5. When the paint has dried up, use your pencil to draw a face and any details you like.

© 2011 Fernanda de Uriarte

6. When you are happy with your Space Invader, draw over the pencil with the fine liner or felt tip pen.

And that’s it! Turn the lights off and watch your Radioactive Space invader glow.

© 2011 Fernanda de Uriarte

© 2011 Fernanda de Uriarte

If you’d like to see more detailed instructions on how to fold the space invader or if you’d like to download a slightly different character check this post.

Make lot’s of space invaders and hang them on string to make a Radioactive mobile… you could also draw a spaceship and paint it with glow in the dark paint and have a whole Radioactive fleet… what else can you do?

Use your imagination and have lots of Radioactive fun.

46_Cocodrilooooo! (Lolly stick characters)

30 Dec

Do you know what happens to lolly sticks once the lollies are over? They turn into crocodiles! (or snakes or ducks or whatever animal you like)

© 2011 Fernanda de Uriarte

It’ll take you about 45 minutes to make a Lolly stick character.

You’ll need:

_6 wooden sticks (lolly sticks)

_7 small black brads

_Green poster paint (or any other water based paint)

_Black felt tip pen and a white or silver pencil/crayon

_Something pointy to punch holes through the sticks, it could be the point of a compass or a sharp needle.

How to make a lolly stick character:

1. Grab 2 sticks and using the point of a compass or a needle, punch a hole on both ends of each stick and another one in the middle.

2. Punch a hole in the middle and on one end of of the remaining 4 sticks.

3. When all the sticks are punched, paint them in green. Let them dry for a little while.

© 2011 Fernanda de Uriarte

4. When the sticks are dry, get the brads and join pairs of sticks through the middle. Make sure to join the sticks with 3 holes together; the ones with two holes should have the holes on the same side. You’ll have 3 X’s as shown below.

© 2011 Fernanda de Uriarte

5. Now join the 3 X’s together using the remaining brads.  You should now be able to make the whole thing longer and shorter by opening and closing the 2 sticks in one end, as if they were scissors.

6. Using your black felt tip pen draw a circle around the brad on one end to make the eye.

7. Draw a mouth and teeth too.

8. Colour the teeth with the white/silver colour and add other details like scales on the back of the crocodile.

© 2011 Fernanda de Uriarte

That’s it! a Crocodile made out of lolly sticks. Now you can open and close it very quickly to make it take big bites!

© 2011 Fernanda de Uriarte

You could follow the same instructions and use different colours to make other animals. What about a duck, or a jumpy fish?!

Have fun (and enjoy the lollies!)

41_Seymour the Lemur

6 Dec

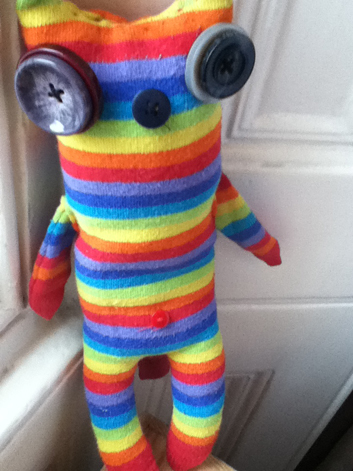
With his stripy body and his huge round eyes in my house now lives a lemur.

Used to be a sock, now he can even walk… everybody welcome Seymur.

© 2011 Fernanda de Uriarte

Seymour the Lemur is easy to make. It will take you about an hour if you have a sewing machine, maybe 31/2-4 if you don’t.

You’ll need:

_A sock, the longer the better.

_4 big buttons. Try to get two of them slightly bigger than the other two.  (these will be the huge round eyes)

_2 small buttons (to make the nose and belly button)

_thread and needle

_scissors

_filling (it can be cotton or a synthetic filling. try to get a washable kind, Seymour might need a bath every once in a while!)

Making Seymour the Lemur:

PARENTS: KEEP AN EYE OR HELP OUT YOUNG CHILDREN WITH THE SEWING.

1. Cut the end of your sock, where your foot goes in. Don’t get rid of it; we’ll use it later.

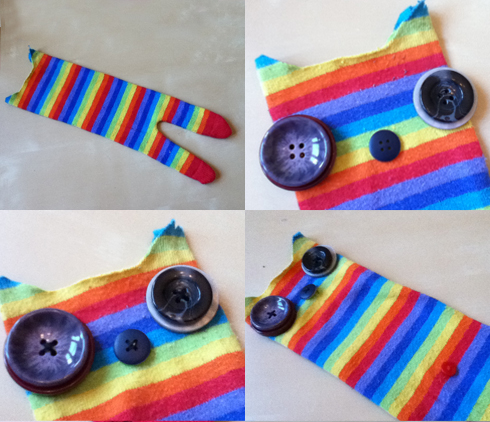
2. Turn what’s left of the sock  inside out and draw the shape of Seymour. Ears at the top and legs at the bottom. We’ll take care of the arms and tail later.

3. Sew the legs over the line you just drew.

4. Cut the sock about 5mm from the stitches.

5. Cut the top about 5mm from the ears/head line. Don’t sew yet.

© 2011 Fernanda de Uriarte

6. Turn the sock right side out.

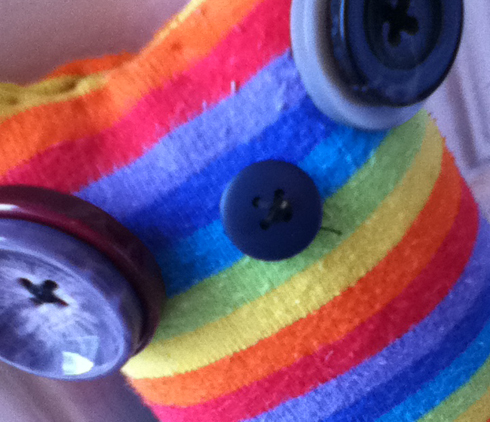
7. Grab the 4 big buttons and one of the small ones and sew them to make the eyes and nose. Remember lemurs have huge eyes so we’re sewing a big button on top of a bigger one for each eye. Sew the eyes as far from each other as you can to give Seymour a very lemur-like expression.

8. Sew the other small button further down, closer to the legs to make a belly button. It´s starting to look like Seymour, isn’t it?!

© 2011 Fernanda de Uriarte

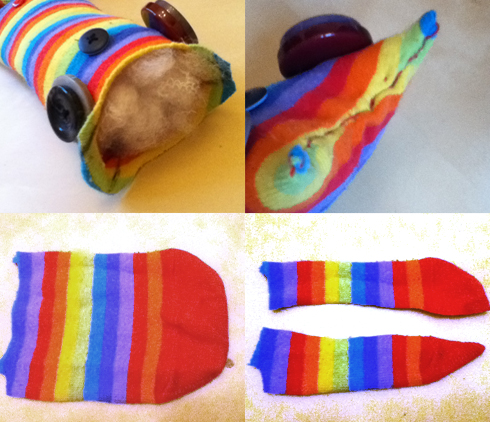
9. Fill the sock with the filling. The legs can be a bit tricky cause they´re so thin, so put little bits at a time.

10. Sew the top of the head to close the whole thing up.

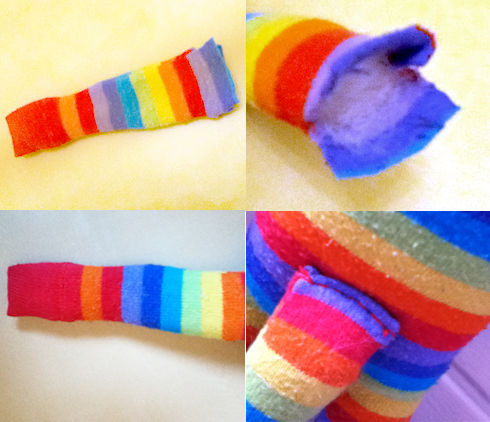
11. Get the tip of the sock and cut it, length wise, in 3. The middle part should be thicker to make the tail.  The 2 ends will make the arms.

12. Turn the arms inside out and sew the edges. They are probably very thin so you might not need to feel them (I didn’t). Turn them right side out again.

© 2011 Fernanda de Uriarte

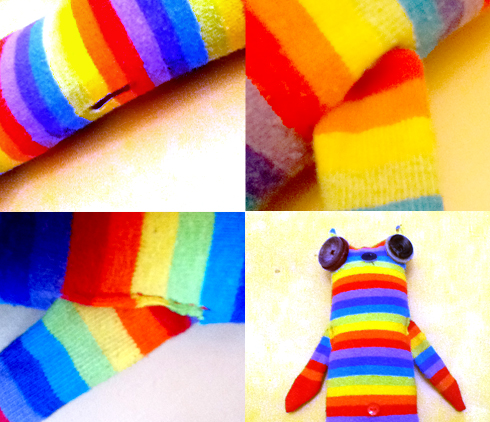
13. Get the body and cut 2 slits round about the middle on each side. This is where the arms will go.

14. Insert both arms, about 5mm-1cm,  and sew the slits close.

© 2011 Fernanda de Uriarte

15. Get the remaining bit of the sock, turn it inside out and sew the sides.

16. Turn the tail right side out and fill it. The tail is thin too so remember to do it little by little so that you don´t end up having bumps and lumps of filling but a nice soft and even fluffy tail.

17. Sew the tail on the back of Seymour’s body, about the same height as the belly button.

© 2011 Fernanda de Uriarte

Ta da!!!

© 2011 Fernanda de Uriarte

Look at him, so cute, with his big round eyes and stripy body.

© 2011 Fernanda de Uriarte

Have fun and take good care of Seymour the Lemur.

40_Stringlanders

7 Nov

Behold for those made of string have landed on thy windows. (Or have fun making string creatures with string, suction cups and markers on your window)

© 2011 Fernanda de Uriarte

Probably the quickest and easiest so far. Making and playing time is the same.

You´ll need:

_Thread, yarn, rafia, etc. At least 60 cm. but the longer your string the more complex Stringlanders you´ll be able to make

_5+  suction cups

_Whiteboard markers  (you can draw on the window and easily clean it with a tissue), dark colours work better.

How to make Stringlanders:

1. Cut a piece of string at least 60 cm long.

2. Tie both ends to make a closed loop.

3. Arrange a few suction cups on the window.

4. Start placing the string over the cups. If it doesn’t stay in place make a small loop around each cup with the string.

© 2011 Fernanda de Uriarte

5. Keep adding cups to shape the sting and make a creature.

6. Make sure that the string is tensed by all the cups when you have the shape you want.

© 2011 Fernanda de Uriarte

7. Get your whiteboard marker and draw all the details that will give your Stringlander personality such as eyes, mouth, hair.. maybe antennae?

© 2011 Fernanda de Uriarte

There you go… a Stringlander on your window.

Move the cups around and re-arange the string to make new creatures

… The same shape can be Batman….

© 2011 Fernanda de Uriarte

Or a chubby creature with hairy armpits!

© 2011 Fernanda de Uriarte

Arrange the cups and string  in tons of different ways, use different colours and make as many Stringlanders as you can imagine.

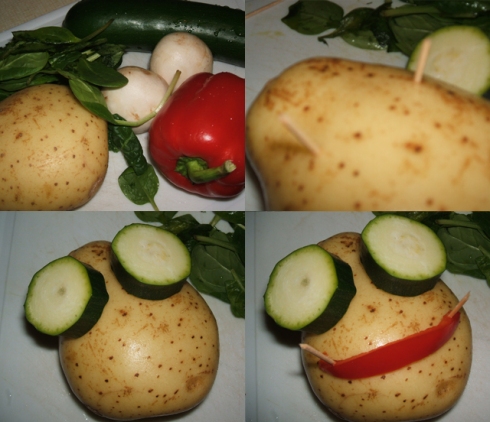
38_Organic Mr. Potato Head

27 Oct

Not the biggest fan of veg? Organic Mr. Potato Head will have you begging for more!

© 2011 Fernanda de Uriarte

It is super easy to make but you´ll need the help of a grown up to help you cook the vegetables.

You´ll need:

_ A boiled or baked potato

_Cooked vegetables that could work as eyes, nose, ears, etc..

_A few toothpicks.

How to make Organic Mr. Potato Head:

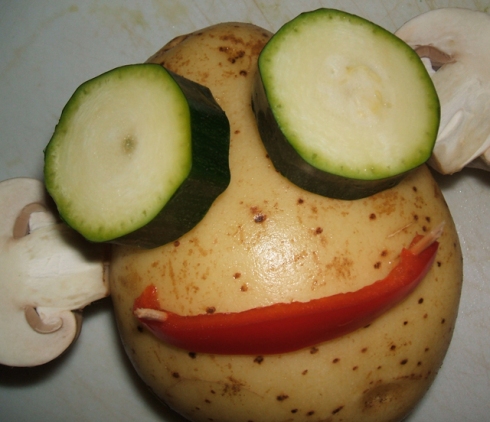
1. Stick a couple of toothpicks into the potato where you want the eyes to be.

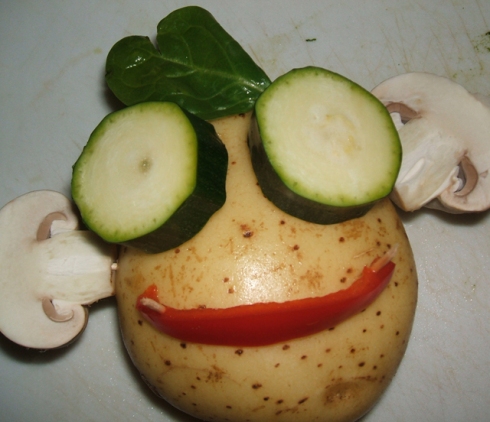
2. Grab a couple slices of veggie goodness and stick ’em on the toothpicks to make the eyes of Mr. Potato Head. I used courgettes.

3. Keep going until you’ve given Mr. Potato Head a mouth, ears, hair and whatever you can think of.

© 2011 Fernanda de Uriarte

© 2011 Fernanda de Uriarte

4. Eat your vegetables and see Mr. Potato change.. Add more stuff and eat it all again.

5. Repeat the process until you´ve finished all your vegetables!

© 2011 Fernanda de Uriarte

Why not try a Mrs. Egg plant Head Miss Tuti Fruty?…

Mr. Beetroot? Yeah I know.. that was pushing it a bit too far.

Have tons of healthy fun.


31_Cork bender

22 Aug

If you´ve broken a few toys trying to arrange them in strange postures, then this one is definitely for you.

© 2011 Fernanda de Uriarte

It will take you between 20 and 30 minutes. Easy, quick and really cool.

What you`ll need to make a cork bender:

_A few bottle corks. (Strictly speaking you need 3 but there are pieces of cork that are too hard to pass the wire through so it´s better to be prepared)

WARNING TO PARENTS: This toy might appear appealing because it encourages adults to drink a few bottles of wine. Please drink responsibly (or wait until the effects of the wine have disappeared before you decide to make the Cork Bender with your children)

_Steel wire

_Knife of cutter

_Pliers

_2 pins with a black top or 2 small brads to make the eyes.

How to make your Cork bender:

1. Using your knife or cutter, cut a piece of cork by half. The two halves will make the feet.

2. Cut 2 slices, about 6mm thick from another one. These are the hands.

© 2011 Fernanda de Uriarte

3. With the pliers, cut 3 pieces of wire, about 12cm, 15cm and 3cm long.

4.Get another cork to make the body of the Cork Bender; use the short piece of wire to pierce a hole all the way through the middle of the cork. This will allow you to pass a wire to make the arms.

5. Do the same, closer to the bottom of the cork, to make a hole for the wire that will make the legs.

© 2011 Fernanda de Uriarte

6. Pass the 12 cm long wire through the hole in the middle of the cork.

7. Pass the 15 cm long wire through the hole closer to the bottom.

8. Insert the 2 slices of cork at the end of both ends of the top wire.

9. Insert the 2 halves of the first cork you cut into the ends of the longer wire.

10. Bend both ends of the bottom wire -the legs- down to make the Cork Bender stand. Arrange the arms any way you like.

11. Get the 2 pins or brads and push them into the body of the cork to make the eyes of your character.

© 2011 Fernanda de Uriarte

© 2011 Fernanda de Uriarte

Done!!!

Now you can make your Cork Bender sit down….

© 2011 Fernanda de Uriarte

… or make a head stand

© 2011 Fernanda de Uriarte

… all bend back

© 2011 Fernanda de Uriarte

… lie down

© 2011 Fernanda de Uriarte

…or whatever you like ….

© 2011 Fernanda de Uriarte

You can still get creative: what would a dog bender look like? or a giraffe?

Happy bending!


30_Mr. Flowerpond (o Sr. Floripondio)

22 Aug

Take him out for a dance and you won´t be disappointed.
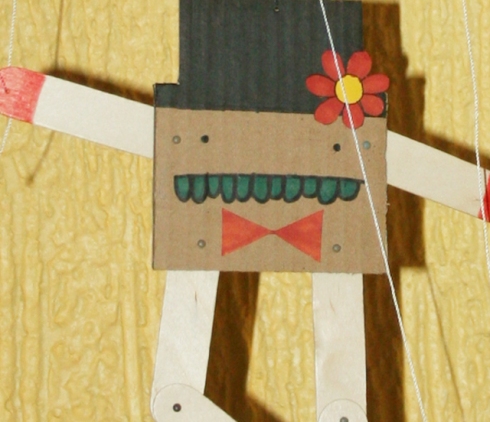
© 2011 Fernanda de Uriarte

It is not very hard to make this puppet; be patient though, when it comes to piercing holes in the wood sticks and tying up the stings. It could take you up to 2 hours to make.

You`ll need:

_A piece of cardboard. It could be a recycled cereal box or back of a paper block or even a piece of corrugated cardboard from packaging.

_Pen and pencil

_Coloured pencils, markers, crayons…

_6 wooden sticks.

_6 small brads

_A piece of paper to draw extra details.

_3-4 m. of thick cotton thread.

_The point of a compass, circle cutter or something similar to pierce little holes in the cardboard and sticks.

_Glue stick

_ UHU or hot glue.

How to make Mr. Flowerpond

1. Cut 2 of the wood sticks by the middle.

2. Use the point of a compass/circle cutter to pierce a tiny hole on each end of the 4 half-wood sticks you were left with and at both ends of 2 complete ones.
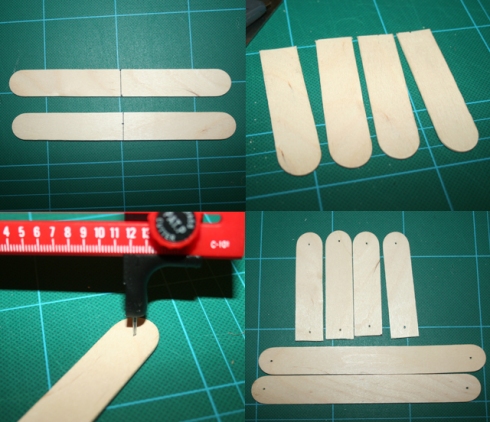
© 2011 Fernanda de Uriarte

3. Cut a rectangle off the piece of cardboard, about 10×12 cm.

4. Place 4 sticks over the cardboard rectangle as if they where the arms and legs.

5. Use the point of the compass/circle cutter to pierce through the cardboard, using the holes previously pierced through the sticks as guides. Punch an extra hole at the top, right in the middle.
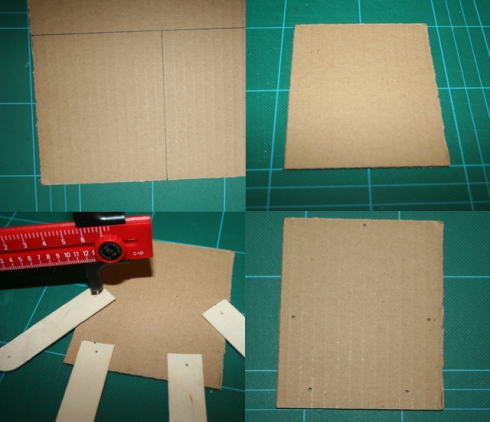
© 2011 Fernanda de Uriarte

6. Use a pencil to draw the face of your character/body of your character. Mine has a hat and some room for a bow tie.

7. When you`re sure about it, draw over it with a black pen to make it stronger.

8. Cut away the extra bits to make the shape of the hat.

9. Use your extra piece of paper to make details, like a bow tie or a flower for the hat.

10. Add some colour and stick the extras.

© 2011 Fernanda de Uriarte

11. Get 2 of the short sticks and colour the tips to make the hands.

12. Get the 2 long ones and colour one tip of each to make the feet/shoes.

13. Get one a foot (a long stick) and a short stick (not a hand) and join them with a brad.

© 2011 Fernanda de Uriarte

14. Now get 4 brads and join the arms and legs to the cardboard body by the holes you pierced earlier.

You should now have the body with moving arms and legs.

© 2011 Fernanda de Uriarte

15. Cut 5 pieces of string about 60cm. long

16. Get the 2 remaining wood sticks and pierce a hole though both ends of both sticks.

17.  Pierce an extra hole right in the middle of one of the sticks.

18. Get a piece of string and pass it through the hole at the end of one of the legs. Tie a knot behind it.

© 2011 Fernanda de Uriarte

19. Do the same for the other leg, both arms and the hole in the middle of the hat.

20. Use the same colour marker you used to colour the hands, etc. to colour the string that goes to each particular hole.

21. Tie the loose ends of each string to the sticks in the following way:

– Start by tying the strings that come out of the legs, one to each side of the same stick.

– Get the string that is tied to the top of the hat and tie it to the middle hole of the other stick. Before you tie the knot, make sure that both sticks are at the same distance form the puppet. You´ll have some spare string.

– Tie the strings that come out of the hands to the remaining holes; once again, make sure that the sting is the right length to get the stick at the right distance.

22. If the knots feel a bit “slippery” put a drop of glue on top of each so that they stay in place.
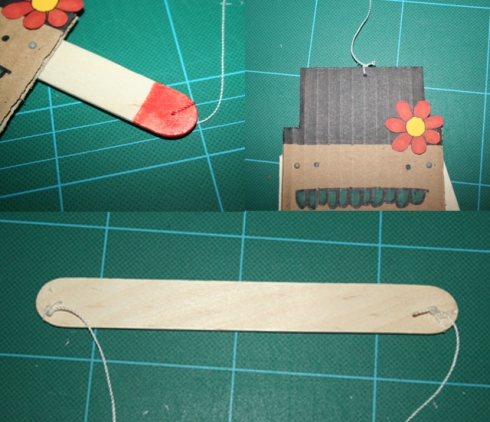
© 2011 Fernanda de Uriarte

That´s it…Mr. Flowerpond is ready to go dancing.

© 2011 Fernanda de Uriarte

Enjoy

29_Shadow Theatre

22 Aug

Bed time stories in the dark were never this fun.

© 2011 Fernanda de Uriarte

It will take you about 45 minutes to make; a bit more if you decide to make more characters.

You`ll need:

_To choose a story to make the characters for. I decided to make Goldilocks and the 3 Bears.

_An A4 piece of cardboard, or as many as you need to make enough characters for your story. (You could recycle a cereal box or the back of a paper block)

_Pencil

_Cutter/Exacto knife, Scissors.

_Cutting mat or a surface to cut on.

_ As many wooden sticks as characters you´re making (I made 4 characters so I used 4 sticks) They could be skewers, just be careful with the pointy ends and make sure you cut them off before you start palying.
_Sticky tape.

_Something to pierce the eyes of the characters, like the point of a compass or a circle cutter.

_A flashlight.

How to make your Shadow Theatre:

1. Draw the silhouette of the characters on your story on the piece of cardboard. Don´t worry about the details inside, like clothes and face;  all you need is the silhouette as that is the only thing you´ll recognize in the shadows.

2. Cut all your drawings out.

3. Use the point of a compass or something similar to pierce the eyes.

4. Use something thicker, like a skewer, to make the eyes bigger.

© 2011 Fernanda de Uriarte

5. Grab a skewer or stick and stick it in the back of one of the characters with sticky tape.

6. Do the same for the rest of the characters.

© 2011 Fernanda de Uriarte

7. Now turn the lights off, turn the flashlight on and point it towards the characters.

8. Tell/represent the story as you move the characters and see their shadows projected on the wall.

© 2011 Fernanda de Uriarte

What other stories can you shadow-tell? how about Hansel and Gretel… or Snow White and the 7 dwarfs?

Lots of cutting but might be fun.

Good night!


27_Dr. Frank’s Amazing (Magnetic) Face Creations

10 Jul

How different would the story had been, had Dr. Frankenstein had a fridge and a few magnets!!

© 2011 Fernanda de Uriarte

This is a quick and easy one. It´ll take you 45 min tops.

You`ll need:

_A computer with internet access (to search for images) or a bunch of magazines to cut eyes and noses and mouths from.

_ 3 or 4 sheets of magnetic paper (depending on how many magnets you want to have in the end).

_ Scissors.

_If you`re cutting things out of magazines, you`ll need a glue stick as well.

How to make Dr. Franks Amazing (Magnetic) Face Creations:

1. Look for images of eyes, mouths and noses and maybe funny stuff like mustaches, weird glasses, long ears… It could be anything, from real people, animals, cartoons.. the idea is to have variety.

2. If you are doing it on your computer, arrange the images in different pages to print them out on the magnetic paper. (You could use PowerPoint, Word, Photoshop…)

If you´re cutting things out from magazines, stick all your images on the magnetic paper.

3. Cut all the images out. You don´t have to worry about cutting the edges too nicely; a rough look works well for this face magnets.

© 2011 Fernanda de Uriarte

4. Take all your magnets to the fridge and start creating amazing faces! (Just like Dr. Frank would have done had he had some)

© 2011 Fernanda de Uriarte

Try some funny faces….

© 2011 Fernanda de Uriarte

© 2011 Fernanda de Uriarte

…. and some scary ones….(looking like someone you know? older sister maybe??)

© 2011 Fernanda de Uriarte

The more images you get the more amazing faces you´ll be able to make.

Get creative and have fun!