Archive | June, 2011

25_Sonic sling shot

27 Jun

Pull and release the balloon at the end…Bang! a paper shot is fired

© 2011 Fernanda de Uriarte

This one is super quick and super fun. It’ll take you about 30-45 min to make.

You’ll need:

_1 cardboard tube from a roll of toilet or kitchen paper

_1 balloon

_pencil and pen or black liner

_coloured markers or felt tip pens

_scissors

_ruler

_cutter or Exacto knife

_all purpose white glue or UHU glue.

_paper scraps

How to make your Sonic sling shot:

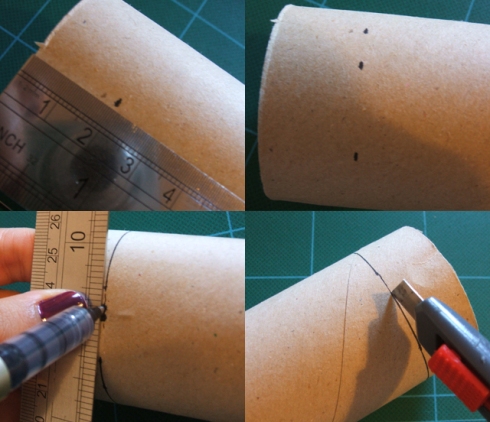
1. We’ll put a balloon on one end of the cardboard tube so we need to make it a bit stronger to avoid it from being squeezed. Grab your ruler and measure 2 cm. down from one end of the tube. Make a mark with a pencil or pen.

2. Make 2 cm marks all around the tube.

3. Use your pen and ruler to connect all the marks. You should now have a line all around the cardboard tube, 2 cm from the edge.

4. Use your cutter to cut the tube along this line.

© 2011 Fernanda de Uriarte

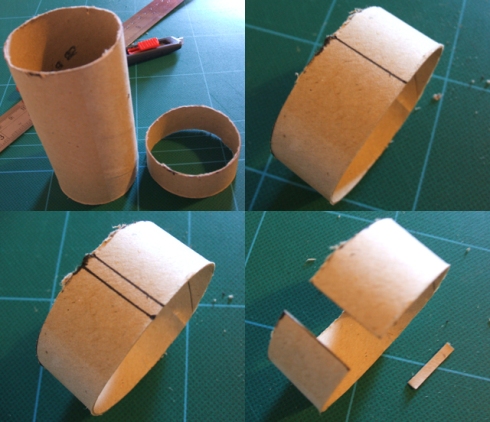
5. You should now have a short and a long tube. Draw a vertical line from top to bottom of the short tube.

6. Draw another line, parallel to the first one, about 3 mm apart.

7. Use your scissors to cut these 2 lines. You should have an “open” tube that fits inside the long tube when you close it again.

© 2011 Fernanda de Uriarte

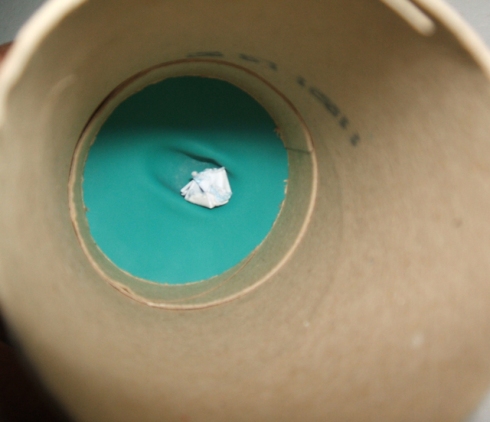
8. Stick the short tube inside the long one making sure the bottom end of both tubes meet. This end of the tube is now a bit stronger. Can you feel the difference?

9. Grab the balloon and cut the bottom off.

10. Stretch the balloon over the “reinforced” end of the cardboard tube.

© 2011 Fernanda de Uriarte

Strictly speaking, your sling shot is now ready and functional… just make a small paper ball or projectile and put it inside  the tube; pull the balloon, let go and see the paper fired with a bang!

If you’d like to have a bit more fun and give colour to your Sonic sling shot, keep reading.

© 2011 Fernanda de Uriarte

11. Use your pencil to draw on the cardboard. I’m making a dragon.

12. When you’re sure about your drawing, use your pen or fine liner to draw on top of the lines.

13. Add some colour and that’s it! You can also add colour to the paper projectiles. Since mine is a dragon, I made my projectiles red and orange, as if it was firing fire balls.

© 2011 Fernanda de Uriarte

© 2011 Fernanda de Uriarte

Have fun! Please make sure you only fire paper and soft stuff and don’t

26 Jun

Pull and let go of the balloon at the end…Bang!

© 2011 Fernanda de Uriarte

This one is super quick and super fun. It’ll take you about 30-45 min to make. (less if you don’t want to draw on it)

You’ll need:

_1 cardboard tube from a roll of toilet or kitchen paper

_1 balloon

_pencil and pen or black liner

_coloured markers or felt tip pens

_scissors

_ruler

_cutter or Exacto knife

_all purpose white glue or UHU glue.

_paper scraps

How to make your Sonic balloon sling shot:

1. We’ll put a balloon on one end of the cardboard tube so we need to make it a bit stronger to avoid it from being squeezed. Grab your ruler and measure 2 cm. down from one end of the tube. Make a mark with a pencil or pen.

2. Make 2 cm marks all around the tube.

3. Use your pen and ruler to connect all the marks. You should now have a line all around the cardboard tube, 2 cm from the edge.

4. Use your cutter to cut the tube along this line.

© 2011 Fernanda de Uriarte

5. You should now have a short and a long tube. Draw a vertical line from top to bottom of the short tube.

6. Draw another line, parallel to the first one, about 3 mm apart.

7. Use your scissors to cut over these 2 lines. You should have an “open” tube that fits inside the long tube when you close it again.

© 2011 Fernanda de Uriarte

8. Stick the short tube inside the long one making sure the bottom end of both tubes meet. This end of the tube is now a bit stronger. Can you feel the difference?

9. Grab the balloon and cut the bottom off.

10. Stretch the balloon over the “reinforced” end of the cardboard tube.

© 2011 Fernanda de Uriarte

Strictly speaking, your sling shot is now ready and functional… just make a small paper ball or projectile and put it inside  the tube; pull the balloon, let go of it and see the paper fired with a bang!

If you’d like to have a bit more fun and give colour to your Sonic sling shot, keep reading.

© 2011 Fernanda de Uriarte

11. Use your pencil to draw on the cardboard. I’m making a dragon.

12. When you’re sure about your drawing, use your pen or fine liner to draw on top of the lines.

13. Add some colour and that’s it! You can also add colour to the paper projectiles. Since mine is a dragon, I made my projectiles red and orange, as if it was firing fire balls.

© 2011 Fernanda de Uriarte

© 2011 Fernanda de Uriarte

What’s your Sonic sling shot look like?

Have fun! Please make sure you only fire paper and soft stuff and don’t aim at people… we don’t anyone getting hurt.

24_Mix ‘n match pals

23 Jun

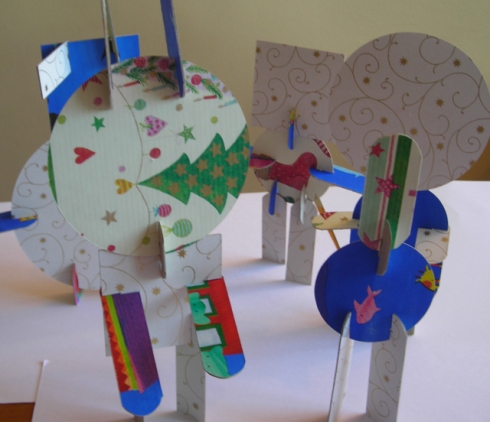
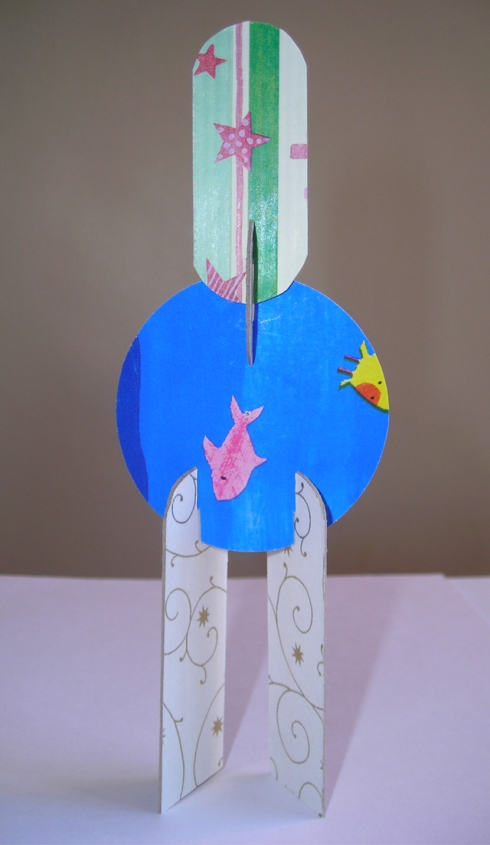
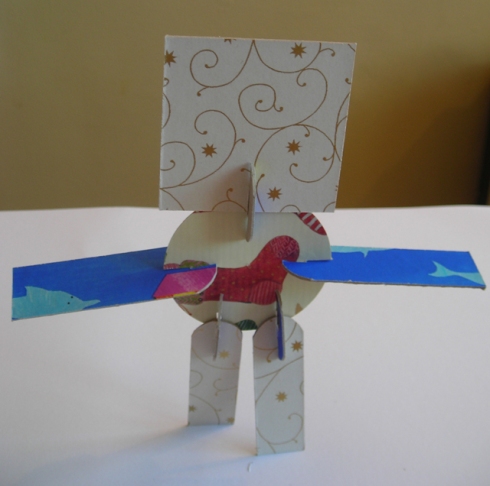
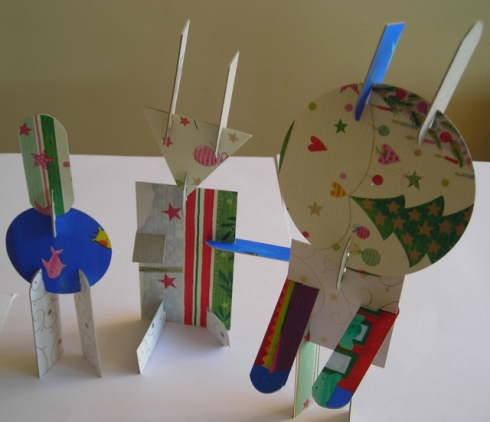
A leg from over here, an arm from over there, the head of another pal, a random body, and there you go.. mix ‘n match all the pieces to make new pals every time.

© 2011 Fernanda de Uriarte

This is an easy one; there´s a lot of cutting involved so it´ll take you a couple hours

You’ll need:

_To download and print these files:

pals_1

pals_2

pals_3

_3 x A4 pieces of card, about 1mm thick (remember to recycle when posible).

_Some wrapping paper left overs (the pieces should be large enough to cover  A4  cards).  You could also use decorative paper, like the one for scrap booking.

_Circle cutter, cutter and cutting mat (or a surface to cut on)

_Ruler

_Glue stick or spray mount (the latter will make your life a bit easier)

How to make your Mix n’ match pals:

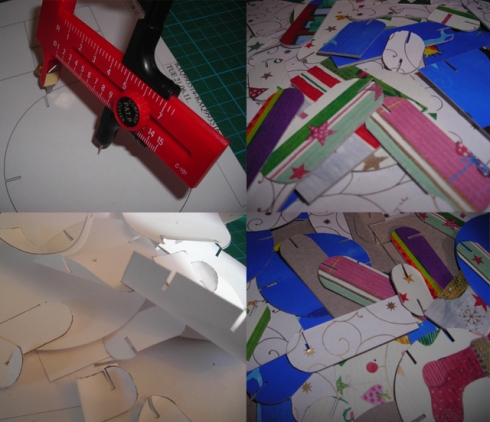
1. Print the files above. If your printer takes it, you can print straight on the card. Otherwise, print on regular paper and stick the prints on one side of the card. (I like the card to be visible in the end, so I use just enough glue/spray mount to make the prints stay while I cut and then easily remove them when I’m done)

2. Cut 3 pieces of wrapping paper about the size of an A4 card. If you have different colours of paper, cut one piece of each.

3. Stick one piece of wrapping paper on the back of each card.

4. Use your ruler and cutter to trim any bits of the wrapping paper that may have exceeded the card.

© 2011 Fernanda de Uriarte

5. Cut all the shapes. If you have a circle cutter you can use it to cut the circles. The center of each circle is marked with a tiny purple “x”.

6. Peel the prints off the card.

© 2011 Fernanda de Uriarte

7. Join the different pieces by the slits and that’s it! That’s the way to mix and match

© 2011 Fernanda de Uriarte

© 2011 Fernanda de Uriarte

© 2011 Fernanda de Uriarte

© 2011 Fernanda de Uriarte

© 2011 Fernanda de Uriarte

Enjoy!

PS. sorry for the delay but you know what they say, it’s better late than never.

running late!!!

20 Jun

hey! running a bit late with toy 24… come back later this week for 24 and 25

23_The Spyscope

12 Jun

Ever wanted to be a spy? Wondered what your little brother is doing? Wished you had something to spot mum when she comes so that you can be good again (without her spotting you of course)? Please welcome the Spyscope, the ultimate tool to see around the corner without leaving your room.

© 2011 Fernanda de Uriarte

This one will take you about 45 min to make.

You`ll need:

_To download and print these files:

viewerandend

mirrorholder

top1

top2

bottom1

bottom2

_6x A4 pieces of card (remember you can always recycle cereal boxes, the back of empty paper blocks, etc.. )

_A mirror about 9cmx9cm or 9cm in diameter if you can only find a round one. (make sure it´s no bigger than 9cm otherwise it wont fit within the blueprints I`m posting)

_Cutter or Exacto knife and a cutting mat or surface to cut on.

_UHU glue.

_Someone to spy on.

How to make your Spyscope:

1. Download and print the files above. If your printer takes the card, you can print directly on it, otherwise, print on regular paper and stick it on the card.

2. Cut all the pieces and fold as appropriate.  (Cut over the black lines, pass over the red dotted lines without cutting all the way through and fold backwards, pass over the purple dotted lines without cutting all the way through and fold towards the front.)

3. Using some UHU glue stick the mirror holder together. It will look like a triangle.

4. Stick the mirror on the base of the triangle.

5. Put some UHU glue on the sides of the mirror holder and stick it to the top 1 and top 2, as shown in the image below.

© 2011 Fernanda de Uriarte

6. Join the ends at 45º. You should now have the back and top of an “L” shape.

7. To close the “L” shape, get the shapes bottom 1 and bottom 2 and stick them together as in the image below

8. Put some UHU glue on the tabs of the 2 pieces of card you just stuck together and stick them to the piece with the mirror holder.

9. Put UHU glue on the tabs on the piece with the mirror holder to completely close the “L”

10. Get the piece called viewer and stick it on one end of the “L”.

11. Stick the end piece on the other end of the “L”

© 2011 Fernanda de Uriarte

Done!!! now you`re ready to spy.

© 2011 Fernanda de Uriarte

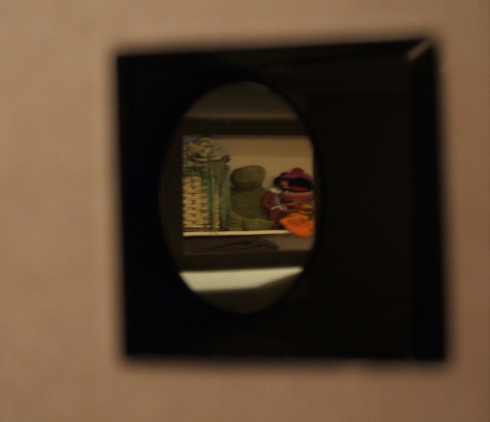
Can you see my eye on the other side?

© 2011 Fernanda de Uriarte

Is that a crocodile and a muppet around the corner?

Happy spying!

22_The Story Maker

5 Jun

Big fan of bedtime stories? What if you could make your own? The Story Maker will give you tons of ideas for you to make tons of new stories.

© 2011 Fernanda de Uriarte

Before I go to the details let me explain a bit more: The Story Maker is tool that will give you hints to start new stories. It is a collection of words divided into 5 categories:

the good guys, the bad guys, the kind of story, setting and random words.

Each group of words is written onto a dial. As you turn the dials you get a combination of 5 words -one word from each category- giving you the characters, setting and kind of story to come up with plus a random word to fit into the story.

With this Story Maker you can get 60 different combinations, but how many stories come out of those depends on your wild imagination.

So lets get started!

It will take you about 2 hours to make. (you can take longer if you get really creative when it comes to decorations)

You`ll need:

_3x A4 pieces of card, as usual, you can recycle a box of cereal or maybe the back of a paper block.

_1 A4 piece of thicker card, about 2mm thick.

_Circle cutter or compass

_Cutter or Exacto knife

_Cutting mat or surface to cut on

_5 small brads (the ones for scrap booking are great cause they come in all colours and sizes).

_1 sheet of coloured paper (I chose black but you can use the colour you want)

_Pencil or pen

_UHU glue

_Coloured pencils, markers or crayons

How to make your Story Maker:

1. Using your circle cutter, cut 5 circles of different sizes off the thicker piece of card. (If you don´t have one, trace the circles and cut them using a cutter or your scissors). Cut the circles no smaller than 3cm in radius.

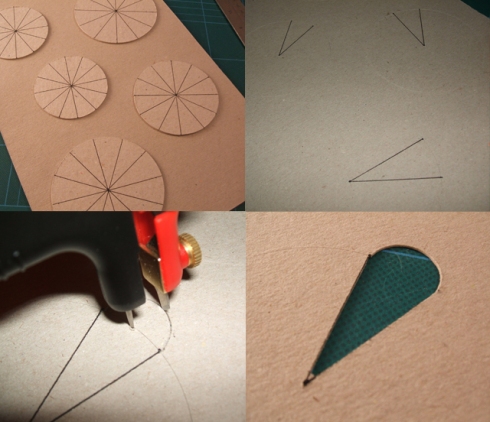
2. Divide one of your circles in 12 pieces, as if you were slicing a cake. To make all the slices the same size, place your circle cutter or compass, opened to the same distance as you used to trace/cut the circle, anywhere on the edge of the circle and make a little mark. Place it again on the mark you just made, make a new mark and so on until you come back to the first point. This will give you 6 marks. To get the other 6, repeat the process starting between 2 of the previous marks. Now trace a line going from the centre of the circle to each mark. You`ll have 12 same-sized slices.

3. Use this circle as a template to slice all the others.

© 2011 Fernanda de Uriarte

4. Arrange all your circles on one of the A4 pieces of card so that there’s a fair distance between each other.

5. Using the pointy end of your circle cutter or compass mark the centre of each circle; using your pen or pencil, mark the ends of the 2 lines that make up a slice of each cirlce.

6. Remove the cut circles and trace a circle, on the A4 piece of card, where the cut ones used to be. Trace each circle the same size as the ones you cut.

7. On each of the traced circles draw 2 lines that go from the centre to the marks of the slices (check the image below). You should now have 5 circles with one slice each.

8. Find the middle, between the edges of each slice and cut half a small circle using that middle point as the centre for this circle. (check the image below)

9. Cut over the 2 lines that made up the slice. You should now have a cut out that looks something like an ice cream cone (check the image below to make this clearer. note how I didn´t go all the way to the centre of the circle; the bottom of the cone is flat).
© 2011 Fernanda de Uriarte

10. Repeat steps 8 and 9 for every circle. When you finish, you should have 5 ice-cream-cone like cut outs.

11. Get the cut circles back. We´ll start getting creative and write the 12 words that will make up each category. Remember? the good guys, the bad guys, setting, kind of story and random words.

These are the words I wrote on each circle. You can use these or come up with your own.

THE GOOD GUYS:

A cowboy, a prince, Macapaca, a princess, a pirate, a mermaid, the Easter Bunny, Mum, a cupcake baker, Goldilocks and the 3 Bears, the Pink Panther and a Polar bear.

THE BAD GUYS:

A dwarf, 3 witches, Rumpelstinskin, an ogre, a bully, a thief, a snake, a king, a monster, a dragon, a wizard and a pirate.

THE SETTINGS:

Inside a volcano, on the kitchen table, under the sea, in a faraway land, inside the drawer, up in the sky, in the deep dark wood, in a candy shop, in the Chocolate Factory, in the town centre, in outer space, in an ice castle.

KIND OF STORY:

Adventure story, a story about a rescue, a sad story, science fiction, a love story, a story about exploring, a funny story, scaaaaaaarry story, a story where someone learns something, a story about helping someone, a story about magic, a story where someone makes a discovery.

RANDOM WORDS:

Jelly Beans, colourful bricks, salt and pepper, ice skates, chocolate covered raisins, a plug, a pair of snickers, swings, chicken pox, a mug of soup, a crazy cow, poo.

Now that all 5 circles have the words written on them, it is time to pin them to the card with the cut outs. I`ll call the circles with words written on them dials.

12. Push a brad through the centre of each circle on the card and its corresponding dial. Bend both ends out to fix the dial and card together, loose enough to allow the dials to turn.

© 2011 Fernanda de Uriarte

13. Once all 5 dials are in place, get another piece of card and stick it to the back of the one with the cut outs. Put glue only on the edges so that the dials can still turn freely.

You should now have 5 “windows” through which you can  turn the dials and read the words of each category.

You have the basics of your Story Maker now… the rest is making it look nicer.

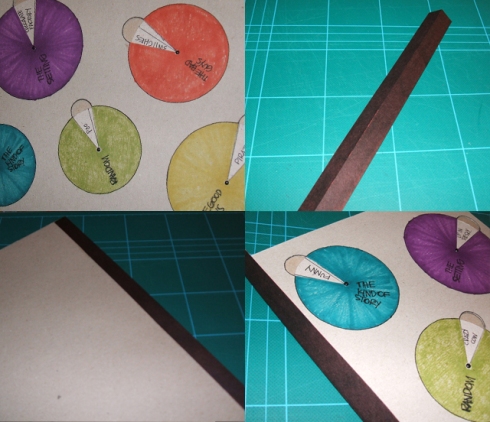
14. Use your coloured pencils, markers and crayons to decorate your Story Maker. I decided to paint each circle in a different colour and write the category it shows so that I know if I´m looking at settings or good guys…

To make your Story Maker look a bit like a book we’ll attach a cover to it:

15. Cut a strip of coloured card, about 3cm wide.

16. Pass the cutter along the middle once or twice without cutting all the way through. This will allow you to fold the strip in half.

17. Put some UHU glue on one half of the stripe (on the inside) and stick it to the back of your Story Maker.

If you turn it around, you should have a loose flap on the front.
© 2011 Fernanda de Uriarte

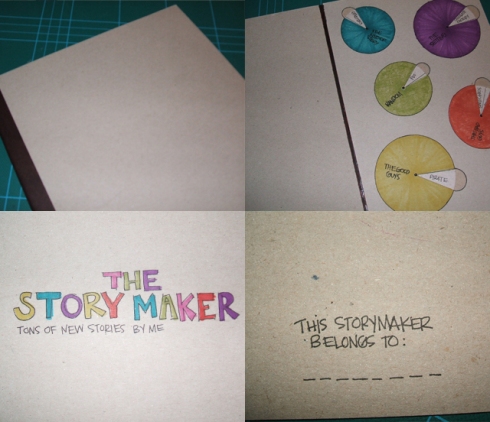
18. Put some glue on this flap and stick the remaining piece of A4 card to it.

You should now have a cover to your Story Maker and be able to open and close it.

19. Add some details and colour to the cover and any others you like.

Ready to start making stories?
© 2011 Fernanda de Uriarte
© 2011 Fernanda de Uriarte

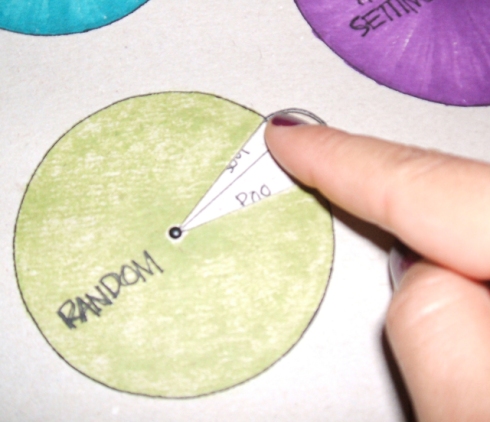
Turn each dial until you see a word you like through the window. Or turn the dials to get random words.

© 2011 Fernanda de Uriarte

Put all the words together and you have the basics of your new story:

How about a story about a polar bear on a quest to discover the hiding place of a pirate and his crazy cow in outer space?

or one about a cowboy that defeated a very scaryogre that lived inside the volcano with the terrible smell of his poo?

See? all sorts of stories can happen!! Just turn the dials and use your imagination.