Tag Archives: box

47_Radioactive Space Invaders

30 Dec

Don’t believe those who claim to have seen alien life forms… this Radioactive Space Invaders are the real thing!

© 2011 Fernanda de Uriarte

It will take you about 45 min to make a Radioactive Space Invader

You´ll need:

_To download and print this file: radioactive space invaders

_ A piece of A4 card for each Space invader you want to make. (You could recycle a cereal box or the back of a paper block for example)

_Cutter or scalpel and a cutting mat or a surface to cut on

_UHU glue

_Pencil

_Black felt tip pen or fine liner

_Glow in the dark paint

_A thin paint brush

How to make a Space Invader:

1. Download and print the file above. If your printer can take card, you can print directly on it; otherwise, print on a regular sheet of paper and stick the print on the card.

2. Using your cutter or scalpel, cut the edges of the print. The dotted lines on the drawing indicate where you’re supposed to score, that is pass the knife a few times without cutting all the way through. This will make it easier to fold all the sides to put your Space Invader together.

3. Fold the card over the dotted lines and glue it together using UHU glue.  Let the glue dry for a couple of minutes so that the Space Invader is sturdy enough for you to handle it.

4. Paint the whole thing with the glow in the dark paint. Let it dry. (Drying time varies depending on the paint you got; read the instructions on the label of your paint).

5. When the paint has dried up, use your pencil to draw a face and any details you like.

© 2011 Fernanda de Uriarte

6. When you are happy with your Space Invader, draw over the pencil with the fine liner or felt tip pen.

And that’s it! Turn the lights off and watch your Radioactive Space invader glow.

© 2011 Fernanda de Uriarte

© 2011 Fernanda de Uriarte

If you’d like to see more detailed instructions on how to fold the space invader or if you’d like to download a slightly different character check this post.

Make lot’s of space invaders and hang them on string to make a Radioactive mobile… you could also draw a spaceship and paint it with glow in the dark paint and have a whole Radioactive fleet… what else can you do?

Use your imagination and have lots of Radioactive fun.

34_The Imagination Box

7 Sep

So… if you´re the kind that likes to play with the box rather than the toy, keep reading.. this one´s definitely for you

© 2011 Fernanda de Uriarte

Probably one of the easiest ones; not the quickest just because you have to let it dry overnight.

You`ll need:

_A cardboard box, maybe from a large appliance or from moving places.

_Water-based blackboard paint and a brush (You´ll find the paint in art shops and some paint shops)

_Old newspapers, recycling paper or a plastic mat/bags to cover the surface where you´ll be painting.

_Masking or parcel tape to secure the bottom of the box.

_Coloured chalk to imagine and transform your box over and over again.

How to make your imagination box:

1. Close the bottom of the box and tape it so that it doesn’t open again.

2. Paint the box with the blackboard paint, including the flaps to open it and close it. Remember to cover the surface where you´ll be painting with cardboard, plastic bags, etc.

© 2011 Fernanda de Uriarte

3. Leave it to dry for a few hours. If there are spots that look a bit “washed out” add an extra layer of paint over those spots.

4. Leave your box to dry for 24 hours or as long as the packaging of the paint suggests.

5. When the box is fully dry, get the chalk and let your imagination fly.

© 2011 Fernanda de Uriarte

What about a space ship?

© 2011 Fernanda de Uriarte

What else could your box be… A monster perhaps?

© 2011 Fernanda de Uriarte

What about a house or a diver suit?…It could be whatever you imagine.. that´s the point!

(When you´re ready to transform your box into something else, use a DRY tissue or cloth to erase the chalk (remember, the paint is water based so if the paper or cloth is damp, you´ll take the paint away))

© 2011 Fernanda de Uriarte


32_Invisibility Box

6 Sep

A magician is not supposed to reveal his tricks, but this time I`ll make an exception … wanna know how to make your hand (or anything really) disappear?

© 2011 Fernanda de Uriarte

Ta-da!

It´ll take you around 2 -2 1/2 hours to make your invisibility box.

You´ll need:

_A border-less mirror.

_Mount board or any other type of thick cardboard (about 2-3 mm thick). I used  black cause we´re doing magic! but you can choose any colour you want.

_A piece of acetate.. It could be that you recycle a plastic packaging or something similar. I actually used the pack of my mirror.

_Double sided tape.

_Ruler.

_Pencil/pen.

_Cutter and cutting mat or a surface to cut on.

_Coloured tape to cover the edges if they don´t look that nice (that´s the downside of using black: every little detail shows!)

_You might need a bit of maths skills for this one, but nothing to worry.. I`ll show you what to do.

How to make an Invisibility Box:

Before we go to the detailed instructions, let me explain a little so that you what I`m talking about all the way through:

The invisibility box works by placing a mirror diagonally inside the box. That way, you get half a box “obscured” from the view of your public and the mirror does the trick by creating the illusion of looking at the whole box through the window at the front. When you put your hand or any other object inside the box you fill the “obscured” part of the box, and because of the mirror illusion, it looks as if your hand was disappearing as it goes inside.

It will be hard for us to find exactly the same size of mirror, that´s why instead of giving you exact measures, I`ll show you how to figure out the dimensions of your box, depending on the size of the mirror you find.

Let´s do it step by step:

1. We´ll start with the maths (yaaay!).

The mirror will be placed at 45º inside the box. That means that the height and depth will have the same dimensions. We`re using Pythagoras theorem to calculate the sides of a right triangle (the sides of the triangle will be the sides of your box). I have simplified and written the formula for you to replace the letters with the right numbers.

The width of your box is the same as the width of your mirror.

Check the diagrams below:

© 2011 Fernanda de Uriarte

2. On the mountboard/cardboard, draw a rectangle the same length and width as your mirror and add about 4 cm. to both ends, lengthwise (8cm. total)

3. Cut the rectangle, including the extra 8 cm; pass the cutter a couple of times of the lines dividing the original rectangle from the extra length, make sure not to cut all the way through.

4. Bend these extra length bits back.

5. Put some double sided tape on the back of your mirror and stick it to the piece you just made.

6. Once you’ve figured out the dimensions of the box, draw a net, on the mountboard/cardboard to make the actual box. (check this posts out to see a few examples of nets so you know how to make yours camera obscura, Spyscope, cubic Transformers). Make sure you make 2 openings: 1 for your hand and other objects to go in and another one to let your audience see the trick; I`ll call the later “the window”.

7. Cut out and score (pass the cutter without going all the way through) where needed.

© 2011 Fernanda de Uriarte

8. Cut a piece of acetate the size of the window plus 5mm on every side. So, if for example, your window is 10cm x 10cm, your piece of acetate will be 11cm x 11 cm.

9. Use some tape to attach the piece of acetate to the window, on the side that will go inside the box.

10. Stick some double sided tape to the tabs (extra bendy bits of your box-to-be)

11. Start folding and sticking the whole thing together. Don´t close it yet! we still have to put the mirror in.

© 2011 Fernanda de Uriarte

12. Remember the cardboard piece with the mirror from the beginning? Get it and stick it with the mirror facing down and towards the acetate window. (check the image below)

13. “Close” the box.

14. If you like, you can use the colour tape to cover the white/not so nice edges and make your box all black and nice.

© 2011 Fernanda de Uriarte

Invisibility box ready to do the trick!

Just stick your hand in and watch it disappear in front of everyone’s eyes.

© 2011 Fernanda de Uriarte

You could also do it the other way around… hide something inside the box and make it appear when you take your hand out.

And remember… a magician never reveals the trick.

(SHHHHHHHHHHH!)

26_Camera Obscura (with 4x optical zoom)

3 Jul

Did you know you can take pictures with a cardboard box with a tiny hole in it? Did you know you can also make pretty accurate drawings using the same device? And that great artists such as Leonardo, used something similar to trace the outlines and minor details of their paintings?

Well now you´ll be able to do great drawings to cause today we´re gonna make a pin hole camera, zoom included. (for making drawings, no photos)

© 2011 Fernanda de Uriarte

It´ll take you about an hour and a half to make and as much time as you like to make your drawings.

You`ll need:

_To print and download the following files:

cameraobscura_1

cameraobscura_2

cameraobscura_3

cameraobscura_4

_4x A4 cardboard pieces (you could recycle cereal boxes or the back of paper blocks)

_Tracing paper

_Ruler

_Rutter/Exacto knife and a cutting mat or surface to cut on.

_Pin, needle or the pointy end of a compass/circle cutter.

_UHU glue.

_Glue stick or Spray Mount (I’d suggest you go for Spray Mount, it´s easier to use, just remember to use it in an open space)

_Black throw or piece of thick fabric, maybe a T-shirt or a jumper (sweater).
_Black felt tip pen or thin liner

_Coloured pencils, crayons or markers.

How to make your Camera Obscura:

1. Print the files above and stick them to the A4 pieces of cardboard. Use just enough Spray Mount (or glue stick) so that the prints stay while you cut and still you are able to “peel” them off when you’re done)

2. Cut all the pieces over the black lines. Pass the cutter a few times over the red dotted lines without going all the way through. This will allow you to fold all the sides and tabs back.

3. Using a pin, needle or pointy end of a compass/circle cutter, punch a tiny hole where indicated with a tiny purple cross. .

4. Peel the prints off and fold all the pieces where indicated. (make sure you mark, maybe with your knife, where the tiny squares are supposed to go; they are marked in purple in the prints)

© 2011 Fernanda de Uriarte

5. Put UHU glue on the tabs and stick everything together. When putting together the piece with the pin hole, make sure you stick the funny shaped bits inside the square sides. (check image below) This will make a kind of rail for the other piece to slide back and forth into this one without going out. This will make the zoom of your camera obscura.

6. Stick the tiny squares in place.

7. You should now be able to slide the piece with the tiny squares into the one with the rails. Make sure the “frame” in the inner piece is facing out. If you feel like it´s too loose, add an extra tiny square on each side.

8. Stick the remaining piece together. It is some sort of cap with a frame on one side.

© 2011 Fernanda de Uriarte

9. To make your Camera Obscura a bit more fun, make a drawing on the side that has the pin hole. Mine has a huuuge eye….

10. We need a surface to capture light and be able to draw. Cut a 9.5×9.5 cm square out of tracing paper.

11. Without using any glue, put the tracing paper square into the “cap” piece.

12. Now put the “cap” with the paper on the camera.

© 2011 Fernanda de Uriarte

Great! Your camera should work now…Ready to make some drawings?

13. Get the black throw or piece of fabric and your black pen and go outside. (you could do it inside but you have to look out the window, it doesn’t work indoors).

14. In order to see what the camera produces you need to be in complete darkness, so, cover the camera and yourself with the throw. Leave the pin hole free. (check the intro photo or the one below)

15. Give your eyes a few moments to adjust and TA DA!!! You’ll start to see the image on the paper! Zoom in and out by sliding the inner cube back and forth.

16. Now you can draw on the paper whatever you see. You`ll need to be really coordinated for this: hold the throw and the camera with one hand and draw with the other!

17. When you’re done tracing, get the piece of paper out of the camera, add details and colour and that’s it!

Cut more tracing paper squares to make as many drawings as you like.

© 2011 Fernanda de Uriarte

Bet your drawings are looking great (and that you look great while using your camera).

Beware great artists… you’ve got competition!

18_Cubic Transformers

10 May

Puzzle cubes meets Transformers: move the cubes around and see your drawings transform!

© 2011 Fernanda de Uriarte

It will take you about 1:30- 1:45  hrs. to make.

You´ll need:

_4 pieces of A4 card

_2 sheets of regular printer paper

_To download and print these files:

on card:

cubes1

cubes2

cubes3

cubes4

on paper:

transformers_1

transformers_2

_Cutter or Exacto knife.

_Cutting mat or a surface to cut on.

_Coloured pencils, crayons or markers.

_Ruler.

_UHU glue.

_Glue stick

_Sticky tape.

How to make your Cubic Transformers:

I have divided the process in 3 parts so that it is easier to follow:

MAKING THE CUBES:

1. Once you have printed the files cubes1cubes2cubes3 and cubes4 on card, use your cutter or Exacto knife to cut all 8 shapes. Cut all the way through the continuous lines; the dotted lines indicate where you should pass the knife a couple times without cutting all the way through. This will allow you to fold all the sides and tabs.

2. Fold the sides and tabs.

3. Put a little UHU on the tabs of one of the cubes and close it. Do the same with the rest.

© 2011 Fernanda de Uriarte

JOINING THE CUBES:

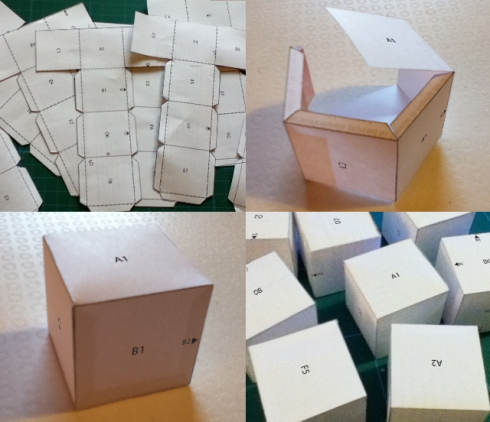
1. I’m sure you’ve noticed that every side of every cubes has a letter and number in the middle; also that some of  the sides have smaller letters and numbers with a little arrow pointing to one of the sides. These are to help you put the right cubes together. So for example, there is a cube that says O6 in the middle of one of it´s sides; this side also says O5 and has an arrow pointing up. This means now we have to find the cube with the side that says O5 in the middle and has a smaller O6 and arrow pointing down.

2. Put these 2 cubes together and add a piece of sticky tape all along the sides that are supposed to meet (in this case the side with O5 and arrow pointing up and the side with O6 and arrow pointing down). Cut the exceeding tape. See the image below to make this clearer.

You should now be able to “fold” the cubes back and forth, as if the sticky tape was a hinge.

3. Fold the cubes all the way back and add some more sticky tape to the sides that meet. This will make the tape hinge stronger.

4. Repeat steps 1 -3 until you’ve joined all the cubes together. When you’ve finished, you should have something that looks like the image below.

© 2011 Fernanda de Uriarte

ADDING THE IMAGES:

1. Print files transformers_1 and transformers_2 on regular printer paper. You`ll notice that these files also have arrows and numbers. These numbers indicate where in the cubes each little square will be stuck.

2. Use your coloured pencils, crayons or markers to add colour and detail to the drawings.

3. When you’re finished colouring, cut all the squares. You`ll have some kind of square puzzles of your drawings. Make sure you don´t mix the squares so that you still know which letter and number corresponds to each square of the drawings.

4. Pick the first square, A1 and stick it on the cube that says A1. The orientation of the letters and numbers in the cubes, will tell which way the drawing squares should be facing.

5. Keep sticking drawing squares onto the different faces of the cubes until you`ve finished all the squares.  You`ll notice that there are more sides on the cubes than drawing squares. It´s ok, the sides with letter O are supposed to be empty. You can colour them all in black if you like.

Ok, with all the drawings in place you’re ready to start transforming! First step, can you arrange all the cubes into a big one?

© 2011 Fernanda de Uriarte

Rotate the big cube, open it and close it again, rearrange all the cubes and see your robots transform.

© 2011 Fernanda de Uriarte

Enjoy!

17_Cardboard, fold-able, stackable, draw-able, imaginable, likable….characters

2 May

Any likeness to a certain square character made of sponge is mere coincidence. Please say hello to the cardboard, fold-able, stackable, draw-able, imaginable, likable….characters.

© 2011 Fernanda de Uriarte

Each cardboard…character will take you about 45 min. a little more if you add lots of detail.

You´ll need:

_To download and print these files:

If you want a small version:  cardboardcharacter_small

If you want a larger version: cardboardcharacter_large

_ A piece of A4 card/thin cardboard for each character you want to make. (You could recycle the cardboard of a cereal box or the back of a paper block for example)

_Cutter or Exacto knife

_Cutting mat or a surface to cut on

_UHU glue

_Pencil

_Black pen or fine liner

_Coloured pencils, markers or crayons.

How to make ’em:

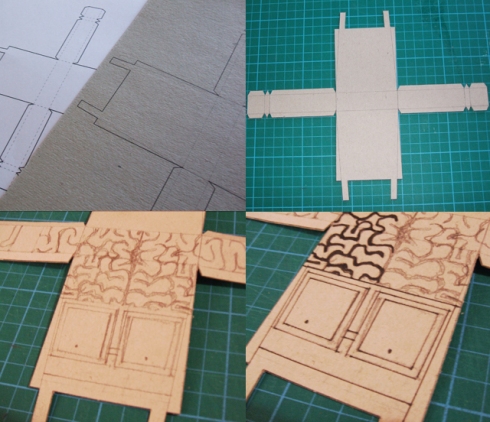
1. Download and print the file(s) above. If your printer can take card, you can print directly on it; otherwise, print on a regular sheet of paper and stick the print on your piece of card/cardboard.

2. Using your cutter or exacto knife cut the edges of the print. The dotted lines on the drawing indicate where you´re supposed to pass the knife a few times without cutting through. This will make it easier to fold the character once you`ve drawn it.

3. Using a pencil, draw the features of your character. Remember to draw all sides.  I’m making a brainy, geeky character.

4. When you’re sure about it, mark all the lines with a black pen or fine liner.

© 2011 Fernanda de Uriarte

5. Time to use some colour!

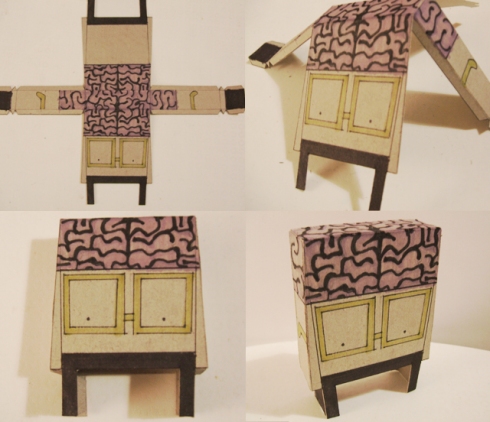
6. When you’re done colouring and decorating, fold all the sides and tabs. There’s a couple of dotted lines that indicate “fold towards the front”; to do that, fold towards the back, just as the others, and then bring it towards the front.

7. Put some UHU glue to the tabs to stick the whole character together and that’s it! I recommend that you do one side at a time so that the glue doesn´t dry up while you do the others.

© 2011 Fernanda de Uriarte

Great!!!! You’ve got a cardboard, fold-able, stackable, draw-able, imaginable, likable….character!

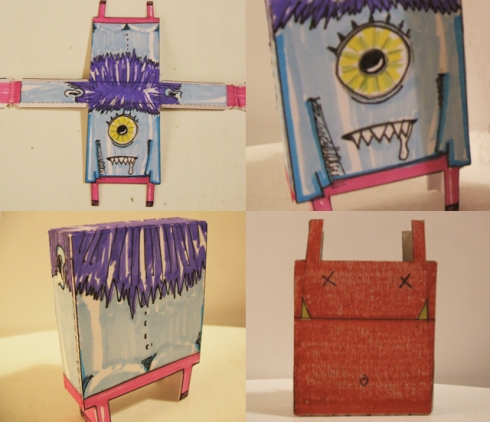
What else can you make? How about a scary one-eyed monster? What if you turn it upside down and the legs become the eyes or a set of horns like this little devil here?

© 2011 Fernanda de Uriarte

See how you can stack them or hide the smaller one inside the larger one? Think of something that makes sense when stacking, like a hen and a chicken? or a large robot with a smaller one inside?; or how about a character that works well if it’s right or upside down?

© 2011 Fernanda de Uriarte

Print, draw and fold as many characters as you can imagine.

© 2011 Fernanda de Uriarte

See ya!

3_The Nightmare Monster

23 Jan

Bad dreams lately? No more! Feed your monster and it will take them all away

Fernanda de Uriarte (c) 2011

Making time: 3 hours  (It takes a bit longer than previous posts but still it’s very easy to make)

You’ll need:

_Cut outs from magazines

_A box with lid attached; it will make the jaws of your monster! (mine is square, but any other shape would work as well)

_ Black felt tip pen

_A sheet of paper

_A compass or a circular object about 7cm in diameter to help you draw some circle sections.

_Scissors and glue stick

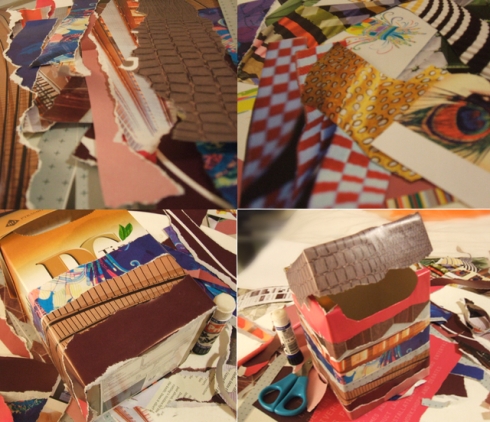
1. Start by choosing colours and textures you find interesting from your magazines. I wanted my monster to be full of textures and different colours so I picked these pages.

2. Split your cut outs in two groups, the first one, larger images, will make the body of the monster; we’ll use the second one to add details, this group can be made up of smaller textures and images. Make sure to leave a piece of paper large enough to cover the top of the box.

3. Tear the images in the first group in long strips. They don’t need to be perfect, in fact, the more irregular your strips are, the more scaly your monster will be.

4. Using the glue stick wrap the strips around the box, try to make every colour or texture go round at least once. Layer them on top of each other.

5. Keep adding strips all the way to the top. I chose a bright pink to make the inside of the mouth and an image of scales to cover the lid. Notice how the paper covering the lid is not straight; this helps give the monster a little more personality.

Fernanda de Uriarte (c) 2011

6. Pick the large piece of paper you reserved for the top and stick it, leaving an extra 5mm on each side. Fold the extras down and stick them on top of the last stripe of the body.

7. We’re done with the body, lets add some detail. Get the second group of magazine cut outs and cut some circles (use your scissors this time). Pick different colours and textures and cut the circles in different sizes.

8. Stick some of them on the top and some at the back of the monster… we’re giving it a spoted back!

Fernanda de Uriarte (c) 2011

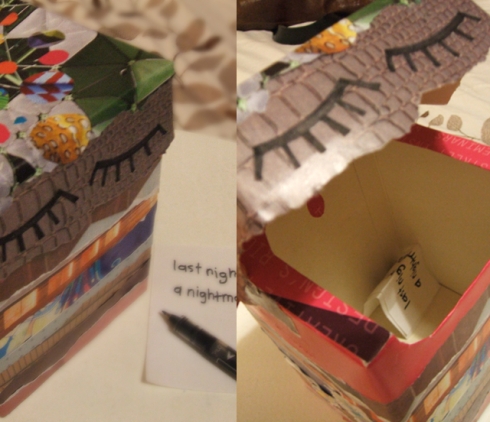
9. Now we’re gonna make the eyes, my monster is sleeping so I’m gonna draw its eyes shut. Use your compass or the edge of your circular objetct and draw a curved line about 3cm long. Then add some straigh lines going out of the curve. These will make the eyelashes of the eyes. Repeat the process for the other eye.

10. Cut both eyes and stick them to the top of the lid.

11. If you want to add a funny detail, cut a drop like shape in the same paper you used to make the inside of the mouth and stick it in the back to resemble the uvula (the dangly thing at the back of your throat).

Fernanda de Uriarte (c) 2011

Done!!! Now, every time you are scared or have a bad dream, write it down, feed the monster and let it chew it away!

Fernanda de Uriarte (c) 2011

Sweet dreams.